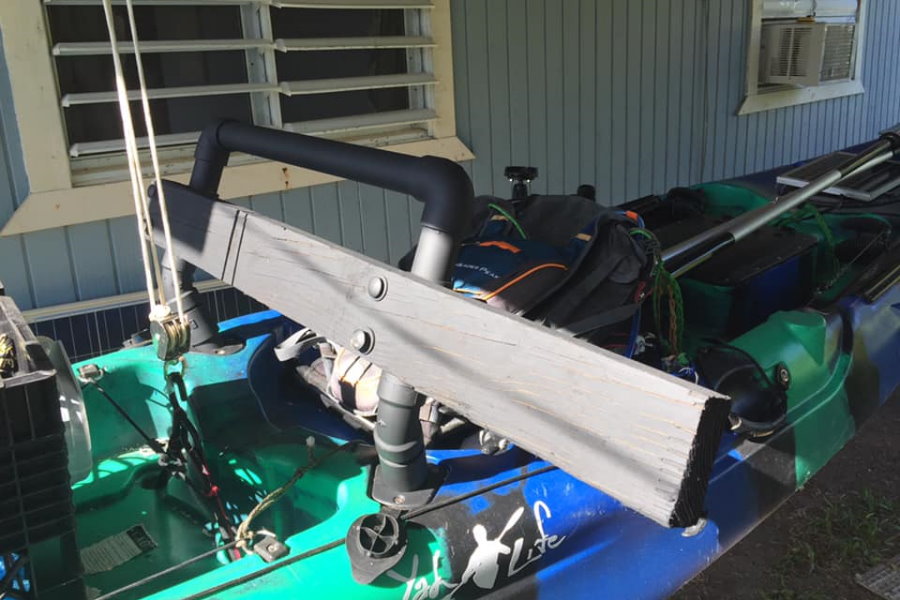
DIY Kayak Trolling Motor Mount
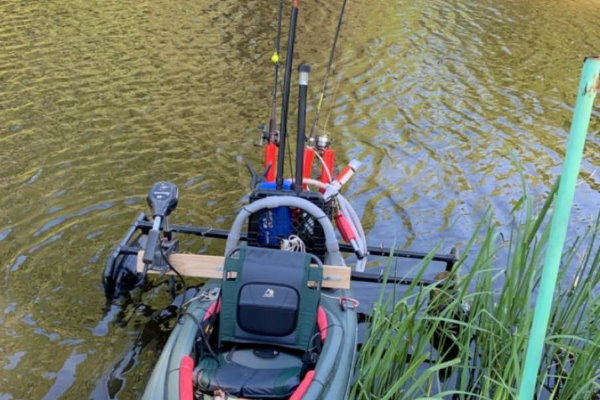
Do you love kayak fishing and admire the convenience of a trolling motor? If so, you’re in luck! With just a few tools and some spare time on your hands, you can easily build your motor mount for an enjoyable day out by the water.
While it might sound challenging to install one of these mounts yourself, with the proper tools and guidelines you can easily assemble and install a reliable motor mount made specifically for your kayak.
In this post, we’ll provide step-by-step instructions to help take the hassle out of designing and assembling a DIY kayak trolling motor mount tailored to fit your needs. So get ready—it’s time to make sure that no wave is too strong when it comes to enjoying all that nature has to offer!
What You’ll Need
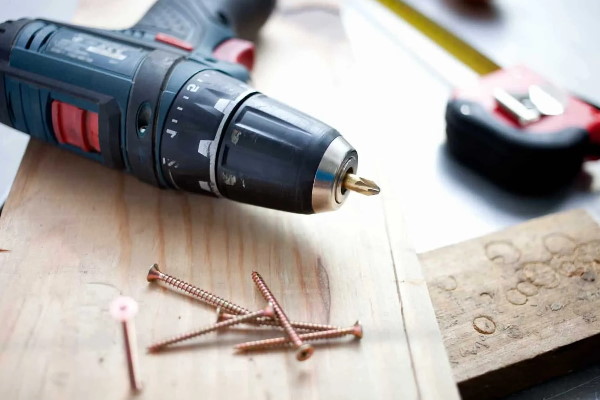
DIY kayak trolling motor mount is a cheap way to ensure that you can take control of your kayak and enjoy an easier ride. Before you start, make sure that you have the following materials:
– Wood or PVC pipe or both
– Ruler and measuring tape
– Sandpaper
– Drill and Screwdriver
– Hacksaw or other cutting tools
– Threadlocker glue
– Hinges
– Wood screws or bolts of appropriate size
– Wood glue
– Washers
– Wing nuts.
Now you have it all. Let’s start!
The Process to DIY Kayak Trolling Motor Mount
Choose The Location to Mount Your Motor
When you’re ready to venture out on the water with a trolling motor, you must make an informed decision about where exactly to mount your new equipment. You could opt for traditional side-mounted motors attached off the gunwales or choose between direct stern and bow mounting solutions – each offering its distinct advantages and disadvantages. Placing one off the side can provide convenient access for fishing with less restriction in motion; motors placed at either end give focused control to navigate as needed. Weighing these advantages and disadvantages before you start is key!
Mounting your motor off the side of your kayak is a great way to make operating it far easier, as you can control it by hand while sitting in the cockpit.
However, if this isn’t an option for you, enjoy the benefits of bow or stern mounting positions for your kayak’s motor with convenience and control. If a stern mount is preferred, the ability to choose between an engine connected directly to foot pedals or one controlled from afar provides additional flexibility and convenience. Remote-controlled motors offer kayak anglers even more freedom to explore rivers with fewer limitations.
However, for this option to be viable you must be working with only the best river fishing kayaks equipped with skegs and foot pedals; otherwise, your motor choice may need to differ depending on its mounting position at either bow or stern of your vessel.
Opting to mount in the back will let you choose either a remotely operated alternative, or one that simply replaces the skeg without compromising on quality. River fishing made easy!
For the fishermen among us looking for a stable, reliable trolling experience with control at their fingertips then bow mounting is most likely your best option. While more expensive than other motors, this remote-controlled solution offers an invaluable advantage: allowing you to keep a line in the water behind the kayak without fear of getting it snared in or damaged by wash from propellers.
Select the Materials
Once you’ve chosen your preferred mounting position and motor type, the next step is to select the right materials.
In crafting a DIY trolling motor mount, PVC piping and wood are two of the most popular options. We recommend opting for PVC due to its superior water resistance. However, heavier motors and those with increased thrust require a sturdier material such as wood two-by-fours or one-by-twos for safety’s sake. Therefore when crafting your mounting system it is important to consider the strength requirements of the specific motor being used to make educated decisions on what materials are best suited for your project.
Wood and PVC can both offer strong support for a trolling motor mount, but each comes with different considerations.
If you’re leaning towards a wooden trolling motor mount for your kayak, using treated lumber and waterproof sealer is essential to keep it from being damaged by water. Another method to ensure waterproof protection and durability is you should pair it with an appropriate stain applied in two even coats before installation.
However, if you are looking for PVC, PVC piping can benefit from increased strength and stability by sliding a piece of rebar inside each straight section; however, this will mean additional weight being added overall to the kayak’s setup.
When it comes to picking the right trolling motor mount, weight is hugely important. If you add too much bulk when constructing your motor mount, even a powerful motor won’t be able to effectively propel you across the water – leaving less thrust than anticipated. Don’t let its rated thrust capacity go to waste when you take your craft out on the water! Make sure that whatever design and materials chosen for construction offer optimal performance with minimal added mass!
Measure and Mark the Mount Location
Now that you have your materials and motor ready, measure and mark the mount location. This is essential in ensuring a secure fit with no gaps or weak points.
When considering the size of your trolling motor mount, think about how much space it takes up on the kayak as well as any additional accessories – such as lights or GoPro mounts – which need to be accounted for when selecting an appropriate motor mount size. If you opt for a larger model, consider adding extra supports to help keep it stable in rougher water conditions.
Once measured, mark this spot on both sides of the craft by making two small “x”s indicating where each bolt will go. Take the time to make sure these marks are precise – your trolling motor mount is only as good as the foundation it’s built on.
Drill the Holes
If your kayak has the pre-existing design for a trolling motor mount, no drilling is necessary – you’re ready to move on to the next step. However, not all fishing kayaks come ready to install. If this is the case for yours and you need to drill holes into its exterior deck to secure it correctly, fear not: follow this guide as we show what steps are needed if that’s where your journey takes you.
Before grabbing your drill, arm yourself with a pencil or Sharpie for accuracy and precision. Carefully mark the desired locations, taking into consideration proper distances from the sides of your kayak to ensure you’re drilling in the ideal place. Once ready to drill holes for attaching components like motor mounts, remember that selecting an appropriately-sized bit is key – not too big nor too small – as this will directly influence how watertight the newly-drilled holes fit with bolts/screws attached later on. It should be slightly smaller than what will eventually plug those holes (e.g., screws/bolts).
Exercise caution while operating drills; gently insert and reverse direction on removal, this helps avoid damage or excessively expanding any one hole!
Ultimately, by following this process well thought out beforehand when boreholes must be made into your vessel they can serve securely and reliably once properly secured!
Construct Your Motor Mount
Now that all the necessary holes have been drilled, it’s time to construct your trolling motor mount! Depending on what material you chose and its specific design, this stage could require different tools.
Securing a trolling motor to your kayak is no small feat. Several factors must be taken into account for the mount construction process to ensure maximum performance out on the water – from where you position it (side, bow, or stern) and its shaft length vs. hull depth differences, right down to how far away from the vessel you need secure it so that propeller won’t clip any of its edges when turning in either direction! Careful consideration should therefore be devoted during this critical installation phase.
It can be beneficial to have an existing trolling motor on hand so you can visually measure for accuracy – as stock dimensions may not always apply perfectly depending on specific boats and motors.
Attach the Mount to Your Kayak
Once you’ve created the foundation of your motor mount, it’s time to affix it to your fishing kayak. Your choice of mounting hardware largely depends on the design of your fishing vessel – if there are areas pre-equipped with rails for a motor mount then utilizing rail bolts is likely an ideal solution as they fit right into these slots and can be reinforced by nuts or washers. When selecting this type of bolt, double-check that its length extends through all necessary holes in the new construct; taking care not to underestimate measurements here!
Have you chosen to add a motor mount to your kayak, but do not have rails? Drilling into the kayak is an option – however, easy access from within via storage compartments or bulkhead openings is required. This method requires longer bolts from inside of the vessel need to be threaded up outwards to secure them over whatever surface you’re mounting onto and some other additional pieces of hardware such as washers, nuts, and lock-washers for attachment security. Please keep this in mind when making any modifications!
Kayak rail bolts can be used when attaching your trolling motor mount to your kayak. However, With a flat base, kayak rail bolts could cause undue pressure on the plastic of your vessel. To preserve optimal performance and longevity in your craft’s hull, alternative mounting solutions are recommended.
We recommend using longer bolts with a sealing washer secured around the head of each bolt for maximum protection from water leakage and suggest adding a sealing washer when bolting the motor mount onto the top of your kayak. Then follow up by securing everything in place with nuts, but not too tightly – overtightening may cause excess stress and lead to damage on both plastic parts and any PVC or wood materials used for your trolling engine mount.
Install the Trolling Motor
Once your trolling motor mount is firmly attached to the kayak and all holes are filled with sealant, it’s time to install the motor. Installing a trolling motor requires connecting two cables – one for power and one for throttle control – as well as properly orienting the motor relative to the hull of your vessel.
Make sure your battery is in good standing before attaching the trolling motor – be mindful of amperage restrictions as well! Connect both electrical wires from the motor to their respective terminals on the battery, then attach any other necessary accessories such as a speed or depth controller. After this is finished, place the trolling motor into its designated mounting slot and secure it with screws if needed.
Test It Out
The last step before you hit the water is to test out your new setup! Turn on the power and make sure all connections are firmly in place while also confirming that your engine runs properly at varying speeds and directions. Once you feel confident in the performance of your motor and mount, you are ready to take it out for a spin!
Finally, don’t forget to review all instructions provided by the manufacturer of your trolling motor mount and examine all parts carefully before installing them on your kayak. This can help ensure optimal performance while protecting you from potential injury or damage during use. Additionally, make sure to properly store and maintain your motor mount after each use – this can help extend its lifespan so that you can continue exploring new waters in comfort and style. Thank you for choosing a trolling motor mount for your kayak – now let’s get out there and make some waves!
With the right setup and careful installation, adding a trolling motor to your kayak can be an incredibly rewarding experience. It provides extra control and propulsion – giving you much more freedom on the water. With this newfound mobility comes increased safety as well as access to new fishing grounds, so don’t hesitate to add a trolling motor to your arsenal today!
Some DIY Kayak Trolling Motor Mount Ideas
In this section, we’ll discuss a few DIY ideas you can use to construct your trolling motor mount. We’ll provide some images and instructions to help you on your way.
Wooden Side-Mount Design
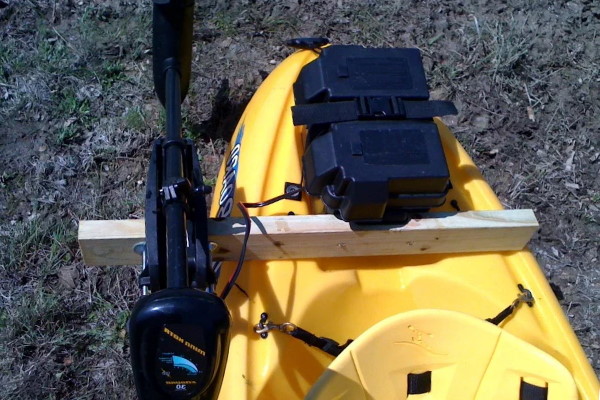
Enjoy the convenience of this custom-designed attachable element for your kayak – fashioned from one substantial piece of wood, with washers and thumbscrews to ensure an easy fix just behind the captain’s chair.
PVC Side-Mount Design
If wood isn’t your preferred material, opt for PVC instead.
PVC + Wooden Mount Design
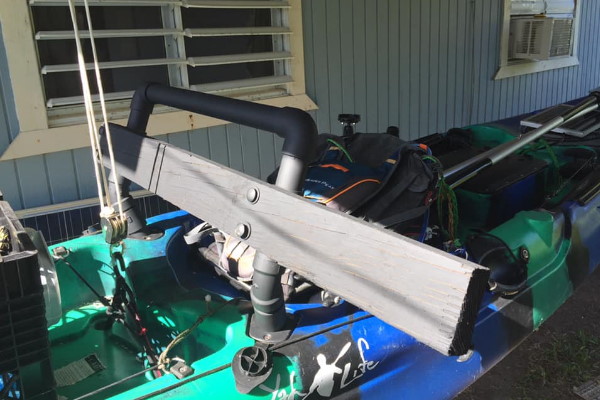
This design is ingeniously crafted, installing two vertical PVC pipes into the rod holders and adding an extended horizontal two-by-four from which he could attach this important piece of equipment.
The ‘Added Rod Holders’ Design
This inventive kayaker had the ingenious idea to incorporate U-shaped bolts and PVC pipes with his existing mounted rod holders. Not only did he replace what was lost, but this remarkable design allowed him to increase capacity by an extra three!
Rear-Mounted Design
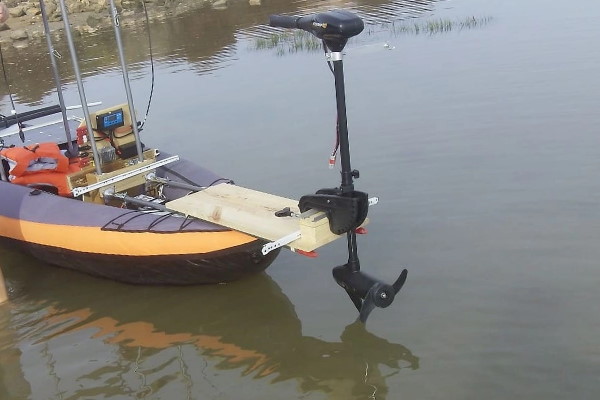
This design is perfect for those who want to enjoy a casual day out on the water without having to worry about any additional attachments. This savvy sailor made use of his existing kayak stern by mounting an inconspicuous trolling motor along with its necessary accessories.
No Drilling DIY Kayak Trolling Motor Mount
This design is perfect for those who want an easy-to-install, no-drilling solution. This setup requires no damage to your boat since you don’t have to drill any holes into the hull. This design also allows for quick removal when needed and can be used on a wide range of kayaks. Just make sure that you use stainless steel hardware as it will stand up better against the elements.
No matter which design you choose, make sure you take safety precautions to ensure a secure attachment that won’t come undone due to wear and tear or erosion over time. Be mindful of your kayak’s weight capacity, as well as the potential force exerted by your motor – too much strain could cause damage and breakage down the line. Additionally, be aware of environmental factors such as strong currents or waves – these can affect how securely attached your motor mount remains. Make sure you research the best materials to use based on your location and conditions.
For help with installation, it’s always a good idea to consult with a professional or an experienced kayaker before starting any project. With adequate preparation and care, you can have your trolling motor mounted up and running in no time – so get out there and start spinning!
FAQs
Can you mount a trolling motor to any kayak?
Yes, you can mount a trolling motor to any kayak with the right mounting equipment and hardware. However, it is important to check the specifications of your vessel before making any modifications to ensure that it is suitable for motorized propulsion. Depending on the size and shape of your kayak, you may need to make modifications or use alternative mounting solutions for optimal performance and safety. Of course, choosing a trolling motor that’s right for your boat from the start is still a better solution than having to tweak it to fit your kayak.
Can I build my trolling motor mount?
Yes! Building a DIY kayak trolling motor mount is an easy and fun project that requires basic tools and supplies. With some planning and patience, you can create an effective and secure mount for your craft in no time at all.
Can I use silicone on my kayak?
Yes, silicone can be used to seal any gaps or holes in your kayak that need protection from the elements. However, it is important to only use silicone on plastic parts, as using it incorrectly or over-tight-sealing can cause damage to other materials or your trolling motor mount. Make sure the silicone is completely dry before placing any parts on top of it and always check the manufacturer’s instructions for specific recommendations. Finally, be aware that some brands do not recommend using silicone on their products at all – so make sure to read the user manual before attempting this project.
Can I screw into my kayak?
Yes, you can safely screw into your kayak if the material is suitable and the screws are of the correct size. However, it is important to always pre-drill holes before inserting any screws to make sure they stay secure and do not cause damage or leakage. Additionally, be aware that some materials are simply too brittle or soft for screwing – in which case rivets or other fastening systems may be required instead. Always read the manufacturer’s instructions before making any modifications to your kayak.
Can I use an electric trolling motor on my kayak?
Yes, you can use an electric trolling motor with a properly installed mounting system for your kayak. Make sure to choose the right size and type of motor – as well as the appropriate mounting system – for your boat and always adhere to the manufacturer’s instructions during installation. Additionally, be aware that some motors may require additional batteries or fuel sources to operate properly. Again, it is important to read all of the manufacturer’s instructions before attempting this project.
Conclusion
So, if you are looking for a cheap and cheerful way to get your trolling motor up and running on your kayak, then this is the article for you! We hope that you have found this guide helpful and that you will now be able to make your trolling motor mount for your kayak with ease.
With just a few tools and some basic know-how, you can easily DIY kayak trolling motor mount that’s both functional and stylish. So what are you waiting for? Get out there and start building! And don’t forget to keep safe while you’re doing it.
If you have any questions or comments about this process, please do not hesitate to reach out to us – we would be more than happy to help! And finally, if you enjoyed this article and would like to see more like it in the future, then please subscribe to our newsletter.
Thanks for reading our article. If you have any questions, leave a comment below. You can see more posts on our website here.
Further reading
How to Mount a Trolling Motor to a Kayak: Four Easy Options
How to Motorize Your Fishing Kayak

