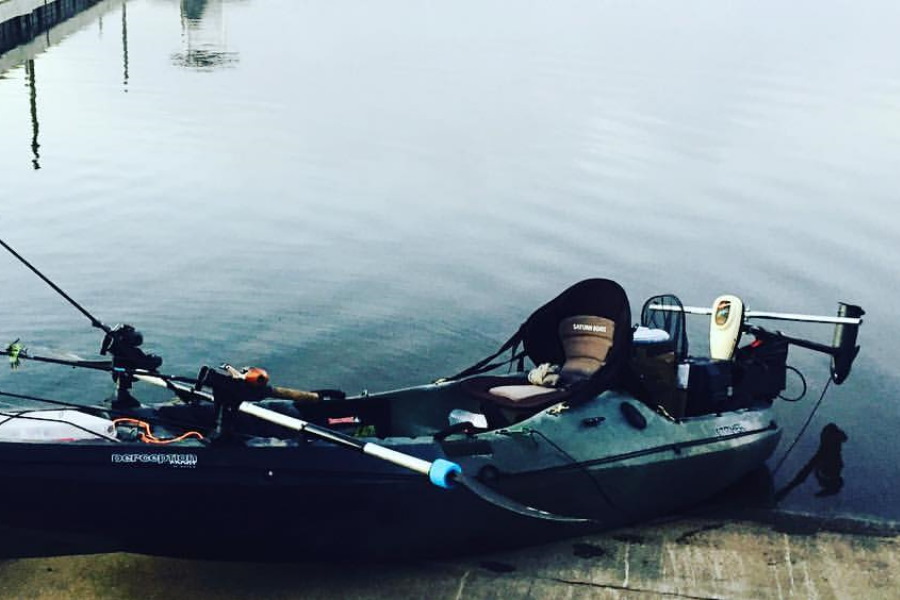
Mounting a Trolling Motor to a Kayak
Whether a beginner or an experienced angler, mounting a trolling motor to a kayak setup can make your time on the water more enjoyable.
In this blog post, we will discuss how to add a trolling motor to a kayak. The weight of the engine, the height of the motor, and the type of mount you use are all crucial factors influent your performance.
When mounting a trolling motor to a kayak, there are a few things you need to consider. This is a relatively simple process, and we’ll walk you through the steps.
So be sure to read through all of the instructions before beginning.
What Is a Trolling Motor?
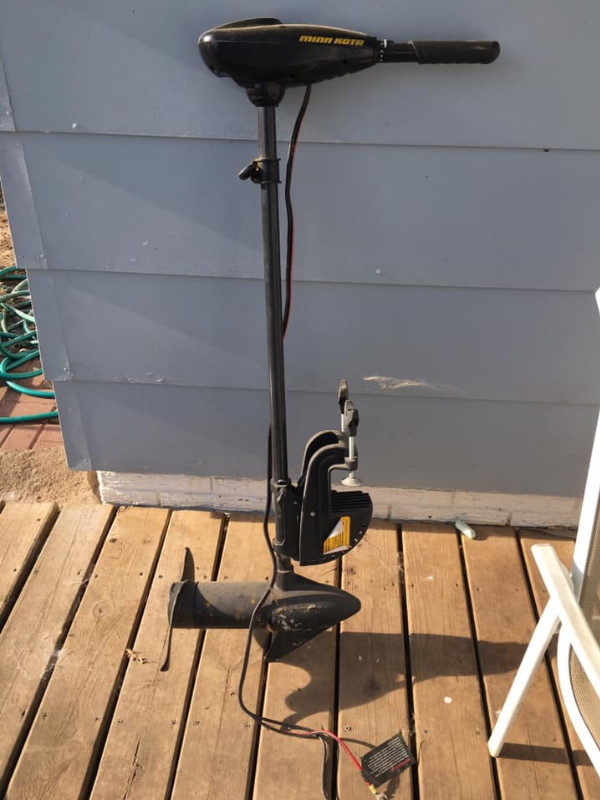
A trolling motor is a small electric motor that can be used to propel kayaks and small boats through the water.
It’s typically mounted on the back of the kayak and can be operated with either a handlebar or foot pedal. Trolling motors are great for fishing, as they allow you to move around without paddling.
They come in various sizes, ranging from the tiny 2-pound models for kayaks to the larger 55-pound models for larger boats. The size you need is dependent on your boat, so be sure to select one with enough power for your vessel.
With various power sources, ranging from battery power to gasoline or diesel fuel, these handy devices can be controlled with either easeful hand and foot controls or wireless remotes – simplifying recreational activities on the open sea!
Keep reading to learn about Mounting a Trolling Motor to a Kayak.
Things to Consider Before Mounting a Trolling Motor to a Kayak
Can You Mount a Trolling Motor on Any Kayak?
For kayak fishing enthusiasts looking to add some power propulsion, many consumer and recreational models are equipped with mounts for adding a trolling motor to a kayak.
While it’s possible to equip any recreational or consumer kayak with a trolling motor, the installation will be far simpler when the vessel comes pre-equipped with mounting fixtures.
However, avoid mounting motors onto racing or whitewater-specific designs as they may not be compatible.
Size of trolling motor
The size of the trolling motor is another important consideration. Smaller motors are often more lightweight and easier to install, making them ideal for kayaks with limited carrying capacity.
On the other hand, larger motors can provide more power and thrust – perfect for larger vessels or those planning on navigating through rougher waters.
Trolling motors have a measurable power or thrust rating. Kayaks are lightweight and don’t need anything too powerful.
For every 2 pounds of thrust, a trolling engine can move 100 pounds. Even for an individual of 150 pounds with 100 pounds of equipment on board their 50-pound kayak, only 6 lbs thrust is needed. However, you should still choose a slightly more powerful trolling motor in case you bring extra fishing gear.
The smallest trolling motor models offer up to 30 lbs of thrust – more than enough for your kayak adventures.
Weight of trolling motor
The weight of the trolling motor is also an important factor. You’ll want to select a model that’s lightweight enough for your vessel and will provide adequate power without overloading it.
When mounting trolling motor on kayak, it’s important to consider the weight rating of both the craft and yourself along with any gear. If you don’t have any idea about the weight capacity of the kayak, we have written an article about it.
Subtracting personal weight makes sure that you don’t exceed your kayak’s limits.
For example, if your kayak’s capacity is 400 lbs., and the total weight of you and your gear is 350 lbs., make sure not to go over 40 for your motor!
Fortunately, most motors meant for use on these kinds of vessels are lightweight enough so finding one suitable should be easy – even when adhering strictly to safety regulations.
Types of power for trolling motor
When mounting trolling motor on kayak, you’ll also need to decide on the type of power. Trolling motors are typically run by electric like battery and solar power, or gas/diesel power.
Electric motor models are more popular among recreational and consumer kayakers, as they are easier to install and maintain. They provide torque without creating too much noise or disturbance in the water. They don’t require any refueling as well – perfect for long days out on the water!
Their convenience cannot be overstated, either – with a simple push of a button or foot pedal, you can control your speed and direction with ease.
Gasoline and diesel motors can provide more thrust – making them ideal for larger vessels or those navigating through rougher waters. However, they require regular maintenance and can be quite loud when running.
Lastly, if you plan on using a wireless remote with your trolling motor, be sure to select a compatible model. This will ensure that you can enjoy the convenience of safely controlling your craft from anywhere on board!
Type of mount
You’ll need to decide what type of mount you’d like to attach the motor to. Most kayak manufacturers offer specific mounting brackets or deck mounts that can be used to secure the engine in place.
Many kayaks come with pre-drilled holes or slots that allow for easy installation of a trolling motor mount plate – but not all do. If yours doesn’t have pre-drilled holes, then you may need to purchase an aftermarket mount.
Choose a mount that’s compatible with your trolling motor and designed for use on kayaks – this will help ensure maximum stability and performance during your outing.
Height of mount
Another key factor when mounting a trolling motor to a kayak is height.
You’ll need to consider the height of the mount. Many trolling motor mounts can be adjusted up and down to accommodate different kayak hull shapes, but this isn’t always the case. Be sure to measure your kayak before purchasing a mount so you know what size and type you need.
Ideally, the motor should be flush with the waterline so as not to disrupt boat balance or cause drag.
This is especially important if your kayak is designed for whitewater uses. If you’re unsure, consult with an experienced technician to ensure proper placement before installation begins.
Once you have all of these considerations sorted out, then it’s time to start mounting trolling motor on kayak!
What Do You Need to Mount Trolling Motor on Kayak?
Trolling Motor
In addition to the thrust mentioned above, when buying a trolling motor, you also need to pay attention to other factors such as:
Battery
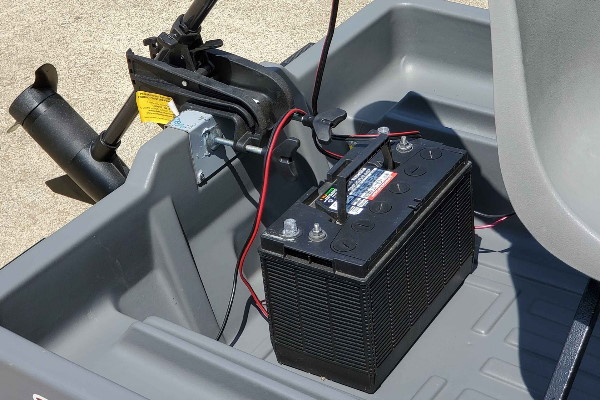
Getting the right battery for your trolling motor is critical to a successful outing on the water. While 12-volt, deep-cycle marine batteries are typically recommended and most frequently used, this may not be what’s best suited for every situation – depending on the power requirements of different motors.
Batteries require measurement by voltage as well as their total energy storage capacity in milliamp hours (mAh).
For example, A 250 mAh rated battery will last about 125 hours when operating at an average current draw of 2 milliamps over that period.
Conversely, if you know how many amps your motor draws during full power operation you can use that figure to calculate approximately how long it’ll last with one complete charge. Ultimately knowing these details ahead of time helps ensure a smooth sailing experience!
Making the right choice in battery power is key to unleashing your trolling motor’s full potential on the water. Strive for a balance between powerful performance and lightweight convenience without compromising quality — so you can make every kayaking experience an extraordinary one!
Size
When selecting the trolling motor, mount, and battery for your kayak fishing adventure, be aware of their size – as they could significantly reduce space in other areas necessary to store essential accessories.
The size of the motor shaft is a critical factor in determining its performance. A longer shaft will offer greater thrust if fishing in deeper waters, but may be too deep for success with shallower conditions.
Consider carefully how to maximize both comfort and convenience when choosing these essential items!
Battery Box or Dry Bag
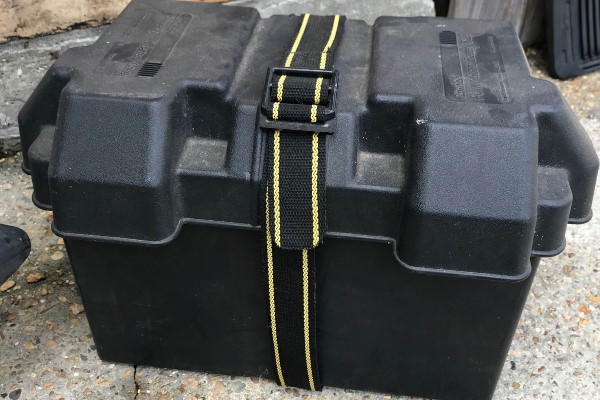
Keep your battery secure and stable in the kayak with a handy battery box. Strapping it down will keep it firmly tethered and free from any unrestrained sliding around or getting lost when paddling!
Your battery box or dry bag should be waterproof and corrosion-resistant, as it will need to protect your battery from water and moisture.
Battery cables
Be sure to get the right size cable for your trolling motor – too short and you won’t have enough power; too long and you’ll cause drag on your kayak.
Mounting bracke
You’ll need a sturdy mounting bracket that can secure the motor in place while out on the water. Be sure to pick one that’s compatible with both your motor as well as your kayak type.
By using a quick-release mounting bracket, kayakers can easily remove their trolling motor with one motion while transporting or storing their watercraft. This innovative tool allows for convenient and effortless detachment when needed.
Wiring Kit
You’ll need a wiring kit to connect the battery power to your trolling motor easier and less messy. Although not always necessary, I would still recommend buying one. A good quality wiring set is essential for safe, efficient performance and reliability on the water.
The kit should include everything you’ll need: waterproof connectors, a fuse holder, a crimp tool, heat shrink tubing, and more – all designed to ensure stable connections with no voltage drop!
Tools

Drill
To begin the installation process, you’ll need a drill and appropriate screws. While not all such installations require these tools, they are beneficial to have in case of need.
Make sure to use marine-grade stainless steel or galvanized steel hardware. This will ensure your mount is properly secured and can withstand the elements.
Also, be sure to double-check that all necessary mounting points are accessible before starting any drilling!
Finally, once you’ve tightened all fasteners and tested them for stability, it’s time to hit the water and enjoy your new kayak trolling experience!
Screwdriver
Once your motor is securely mounted, use a screwdriver to make sure all screws, nuts, and bolts are tightened properly before you get out on the water. This will help ensure safety and prevent any potential mishaps from occurring while fishing or paddling!
Working with plastic or fiberglass may require extra care, especially when it comes to fastening screws. Instead of relying on the speed and convenience of an impact tool, use a screwdriver for manual tightening – this will help ensure that you don’t strip these delicate materials!
Wrench
Mounting a Trolling Motor to a Kayak may also require a wrench, especially when dealing with nuts and bolts that need to be tightened securely. A socket wrench is recommended as it provides more stability than an adjustable one. Be sure to use the proper size for the job – too big or too small will compromise the integrity of your mount!
It’s important to get all your fasteners as tight as possible to ensure maximum performance on the water. This will prevent any rattling or loose parts from hindering your trolling experience!
Screws or Bolts
You’ll need the appropriate screws or bolts for securing the mount and trolling motor to your kayak. Be sure to use marine-grade stainless steel fasteners for long-lasting results.
Silicone Sealant
Finally, don’t forget about the silicone sealant. This will help protect your trolling motor from water damage and corrosion by creating a moisture-resistant barrier. You don’t need much so a small tube is probably enough.
This added layer of protection is essential for any exposed screws or bolts that may be visible on the surface of the mount – it will keep them safe and secure even in rough waters! Apply a thin bead to all joints, seams, and connections before heading out into open waters.
These are just some of the essential items needed for mounting a trolling motor to a kayak.
How to Mount Your Trolling Motor?
Choose Mounting Location
When purchasing a trolling motor for your kayak, you must think about where you’d like to mount it.
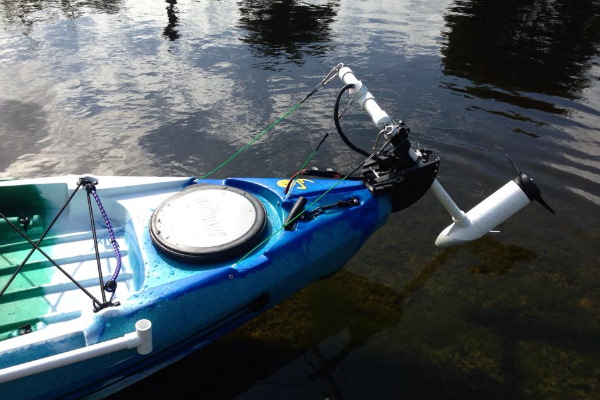
You can attach a motor on the bow, stern, or gunwales of most fishing vessels; mounting at the latter provides easy access while in your seat. If opting for either end however be sure that remote control operation comes as an option – this will ensure flexibility and steering accuracy during those sun-kissed boat rides!
However, operating a kayak with an attached motor on the side of your kayak can introduce some unique challenges for navigational control, as the additional thrust may impact one side of your kayak more than the other.
So you need some practice and skillful maneuvering to be able to drive your craft straight or turn it in whichever direction you choose!
Attach The Propeller To The Motor
Once you’ve chosen your mounting location, the next step is to attach the propeller to the motor.
Most manufacturers won’t provide motors with their propellers attached. This ensures safety and prevents damage to the propeller during transport.
If it comes with the propeller, the process of attaching it should be straightforward. Be sure to consult manufacturer instructions beforehand for optimal results!
For those motors without included props, aftermarket models are available for purchase and it is advised to always have a backup in case you run aground or otherwise damage your original one.
Not all props increase speed; however, they may improve thrust capabilities which will give you greater power when navigating waters via kayak.
Using a few self-tapping screws or bolts (depending on the type of motor), secure the propeller in place tightly, but not too tight as it could cause damage.
You’ll also want to check that all connections are properly secured before powering up your trolling motor. This will help ensure efficient performance and safety while out on the waters!
Mounting a Trolling Motor to a Kayak
After selecting your motor and compatible mount, it’s time to affix them to your kayak. If the mount comes with clamps, attach these firmly onto the gunwales of your kayak.
Alternatively, if attaching directly to a bow or stern of the vessel this may involve drilling holes before securing in place via bolts-and-nuts combinations.
Take this opportunity to add rubber gaskets and liquid sealant too to ensure that no water infiltrates via any drill points post-application!
Installing trolling motor on kayak using the appropriate bolts is made easy when your mount is in place.
To ensure a secure, tension-free mount for your trolling motor conforming to various water depths and conditions, most mounts provide swivel or pivoting capabilities.
In use, the mounting is secured by a pin—a crucial safety measure that must not be overlooked before heading out onto the waters with your kayak.
If you need to raise it while still in open water, however, this necessitates removing said pin – potentially hazardous when in deep bodies of water. Consider attaching a floating buoy or similar attachment to the pin for added security against loss if dropped accidentally in this case.
Build Steering Linkages
For those wishing only manual operations, mounting your motor on gunwale is recommended without the need for additional linkage construction. It means you can skip this step.
In remaining cases, kayak trolling motors can be mounted on the bow or stern of a kayak. Those that choose this location must build steering linkages to control the motor, allowing them to use foot pedals in their kayaks for easy maneuverability and precision navigation for optimal hands-free operation.
Installing steering linkage on non-equipped vessels may be more complicated and we’d recommend attaching them near the gunwale.
This makes it the perfect addition to any sit-inside vessel that’s already equipped with a skeg or rudder.
Mounting a trolling motor to a kayak is easy if your boat already has an existing skeg or rudder. You only need to replace your existing skeg with a trolling motor.
Start by identifying the entry points of steering linkages and detaching the fittings that connect the steering linkages to this feature and then remove it from your craft.
Once you’ve done so, attach two metal eye bolts of appropriate length – depending on where exactly they enter – onto the shaft at their height before mounting your new motor.
To ensure your trolling motor works at optimal efficiency, make sure you attach the linkages to the eye bolts with just enough play.
If these linkages are too tight when connected with an eye bolt, movement of the shaft will be restricted and this could alter its effectiveness.
If there’s not enough room for slack when attached, consider adding a small extension cable – this will allow it to move freely and maximize its effectiveness. Before taking your trolling motor out on the water, you can also test out how well your motor is functioning by propping up your kayak on portable stands before taking it onto open water!
Wire your trolling motor
To ensure your motor is ready for the waters ahead, wiring it to a deep-cycle marine battery should be the next step in preparation. The great news is that we don’t have too much of a complicated task ahead of us!
To initiate this process begins by removing the cap on top to access all wiring components within. You’ll see two wires with varying colors – depending on the type of model used – that need an attachment to their respective ports on the battery: one being a ground wire and another as an active lead. Always consult manufacturer instructions when uncertain about connections!
Don’t take the standard coloring of wires for granted; it could be different than what you expect. For example, instead of a black ground and red hot lead, these colors may vary depending on the manufacturer so make sure to read all documentation thoroughly before installation!
If that doesn’t help with your wiring process there are plenty of visual aids available online such as YouTube videos tailored specifically for your motor model – an invaluable tool in completing any project safely and efficiently.
After connecting the necessary wires and confirming that your motor is running smoothly, having watertight connections ensures maximum performance of your trolling motor.
Fortunately, good quality marine battery terminals come with a protective covering already in place, while most wires are optimally shielded from moisture by waterproof coatings for added peace of mind.
Finally, if you’re using an electric motor, adding a kill switch as an extra safety measure is highly recommended should any issue arise while still on open water. By affixing this directly to the battery or motor itself it allows you to quickly shut off its power in the event of a malfunction.
Test Your Setup
Finally, before heading out onto the waters with your newly installed motorized kayak setup – test everything while within the safety of your own home.
This will help you to establish that all wires have been connected properly and that all systems are functioning as they should be – ensuring an enjoyable journey out on the open waters every time.
Now’s the perfect opportunity to make sure everything is operating nicely, so don’t skimp on this important step!
Ready to gain a practical perspective on bow mount kayak trolling motors? Drawing from the combined rewards of fishing and mastering motor controls, take your new motor out for an invigorating test run. Take time to get familiarized with its features and use of remote control so that you can maximize an incredible fishing experience. With this powerful tool, each trip promises adventure as well as a rewarding learning opportunity – making it truly worth investing in!
Mounting Trolling Motor on Kayak Transom
Adding a trolling motor to the transom of your kayak is one of the most straightforward ways to mount it if you have all the necessary components and equipment. While inflatable models usually require this method, other types are compatible with stern mounts as well.
I use an outboard motor for my boat that attaches quickly at transport time, making it simple enough even for one person – likely similar in ease when mounting a trolling motor to a kayak!
Place the trolling motor bracket on your kayak transom
Begin the installation of your kayak trolling motor mount by placing it carefully onto the transom. Slide it down firmly for even placement. Make sure to hand-tighten both wing bolts simultaneously, adjusting in similar increments. It’s essential to start one side before fully tightening the other; this will prevent any crookedness or lopsided installation.
Connecting the battery
Once you’ve determined where to place the battery, it’s time for connection! If your choice is in the back of your kayak, all that’s needed are a few wire adjustments – unless tidiness takes precedence and holes need drilling.
On the other hand, if the placement is at the front then wiring kits as well as drilled holes will be necessary.
It may sound like a hassle but don’t overlook testing afterward; running through each feature helps make sure everything functions perfectly before hitting those waters!
Test Your Setup
After the installation is complete, it’s time to take your new transom mount kayak trolling motor out for a spin. Head on over to some nearby water and test how well it works – you’ll likely want to personalize its setup even further with adjustability options tailored towards your specific style of fishing!
Make sure you take note of all things that need tweaking: from convenient height adjustments to customizable steering. With these minor changes, it will soon become a truly personalized fit for your unique style of fishing ventures.
FQAs
Do you need to register your kayak with a trolling motor?
Whether you need to register a boat powered by trolling motors depends on your location. Generally speaking, human-powered vessels are exempt from registration requirements; however, when adding a trolling motor to a kayak component things can change quickly!
In some states, there is no need for additional paperwork with small electric engines – but others may request that these crafts receive legal recognition and proper documentation before enjoying their waters.
Is it easy to remove a trolling motor from a kayak?
It depends on the type of mount you have and the brand of your trolling motor. Some are designed with quick-release systems that allow you to easily detach them in a matter of minutes.
Can I use my trolling motor on a river?
Yes, many people use their trolling motors in rivers and other moving bodies of water. However, as with anything else on open water, be sure to take safety measures such as wearing life jackets and following proper navigation protocols.
What can happen if my trolling motor isn’t correctly mounted?
If you’re trolling motor isn’t securely mounted, you run the risk of it coming loose or even flying off while in use. This can cause serious damage to both your boat and the motor itself, so make sure to consult a professional if you’re unsure about how to install it correctly.
Mounting a trolling motor to a kayak is an exciting and rewarding learning opportunity – making it truly worth investing in! With proper installation and usage, you’re sure to have many successful and enjoyable fishing trips ahead. So take the plunge – equip yourself with the right gear, enjoy the ride, and explore new depths of angling success!
What would make a trolling motor run backward?
A trolling motor should only turn one way, depending on the connections and power supply. If it isn’t hanging in the direction you want, then check your wiring and the polarity of your battery – this could be what’s causing it to run backward. Also, if the propeller or impeller is damaged or obstructed, this can cause it to spin incorrectly.
Conclusion
Mounting a trolling motor to your kayak can be a great way to increase your speed and distance traveled.
By following the steps in this article, you can have your trolling motor mounted in no time!
If you have any questions, please leave them in the comments below and we will do our best to answer them. Happy fishing!
Thanks for reading our article about Mounting a Trolling Motor to a Kayak. If you have any questions, leave a comment below. You can see more posts on our website here.
Further reading
How to Mount a Trolling Motor to a Kayak: Four Easy Options

